💡 In this guide, we’ll cover the basics of working with Glossi projects inside of Glossi Studio. You can come back to this guide any time you need a refresher. To keep it simple (and reduce our word count 😉), we’ll call them projects and the studio in this guide. Want to learn more about how Glossi’s project navigator and the Studio are related? Check out our What is Glossi? guide.
What are Projects?
Projects in Glossi offer the tools needed to create, share, and refine your 3D renders. These projects are essential for designers, product managers, marketers, and anyone interested in 3D creation, offering a platform to explore ideas or manage the entire 3D rendering process.
Projects contain a single model with an associated environment and camera configurations. To work on your scenes and export renders, open a project with the Studio.
Learn more about the relationship between projects, models, workspaces, and exports at Project Structure and Organization↗
Opening projects in the Studio
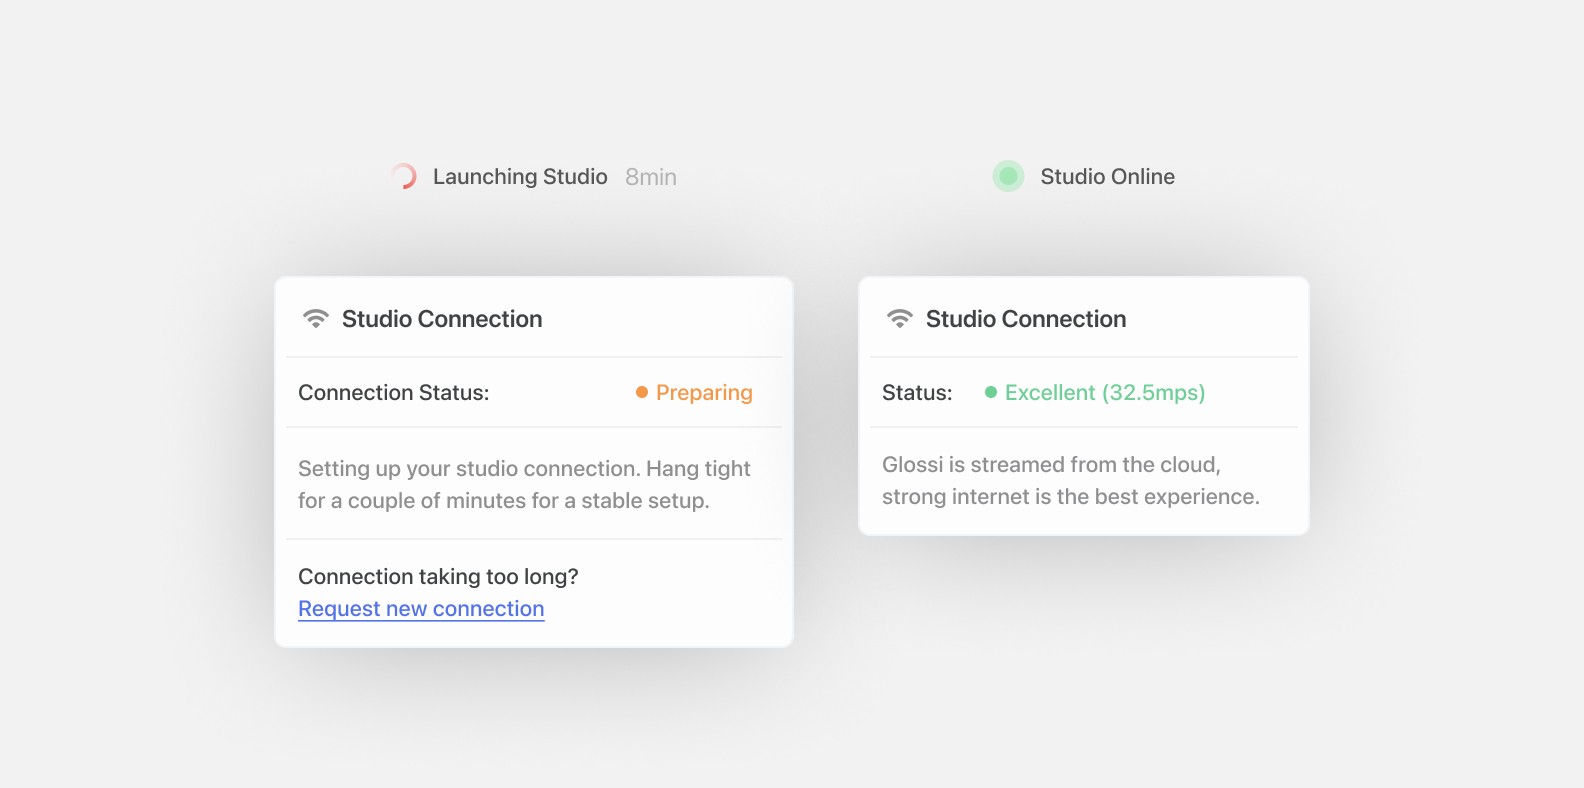
When first opening the Glossi app, a new instance of the studio has to start up. Because of the intense computational requirements of a real-time rendering environment, this may take a few minutes. You can check the Studio’s connection status in the top right of the project navigator.
A few tips to ensure the best connection:
Ensure you have a strong internet connection. For an ideal experience, it’s recommended that you have 100 Mbps down / 10 Mbps up. Although lower speeds might affect the streaming responsiveness of the app, it won’t effect the quality of renders. Don’t know your connection strength? You can test it here
Only open a single tab of the Glossi app at a time. Multiple tabs can cause conflicts and fight for bandwidth.
Find your way around
If you're new to Glossi, it's normal to feel a bit lost when you first open a project. We’ll take you on a tour, so you can orient yourself and start rendering your models.
The Studio has four distinct regions: a toolbar, a timeline bar, a right sidebar, and the scene frame. We’ve simplified the layout so you can get to know what lives in each location.
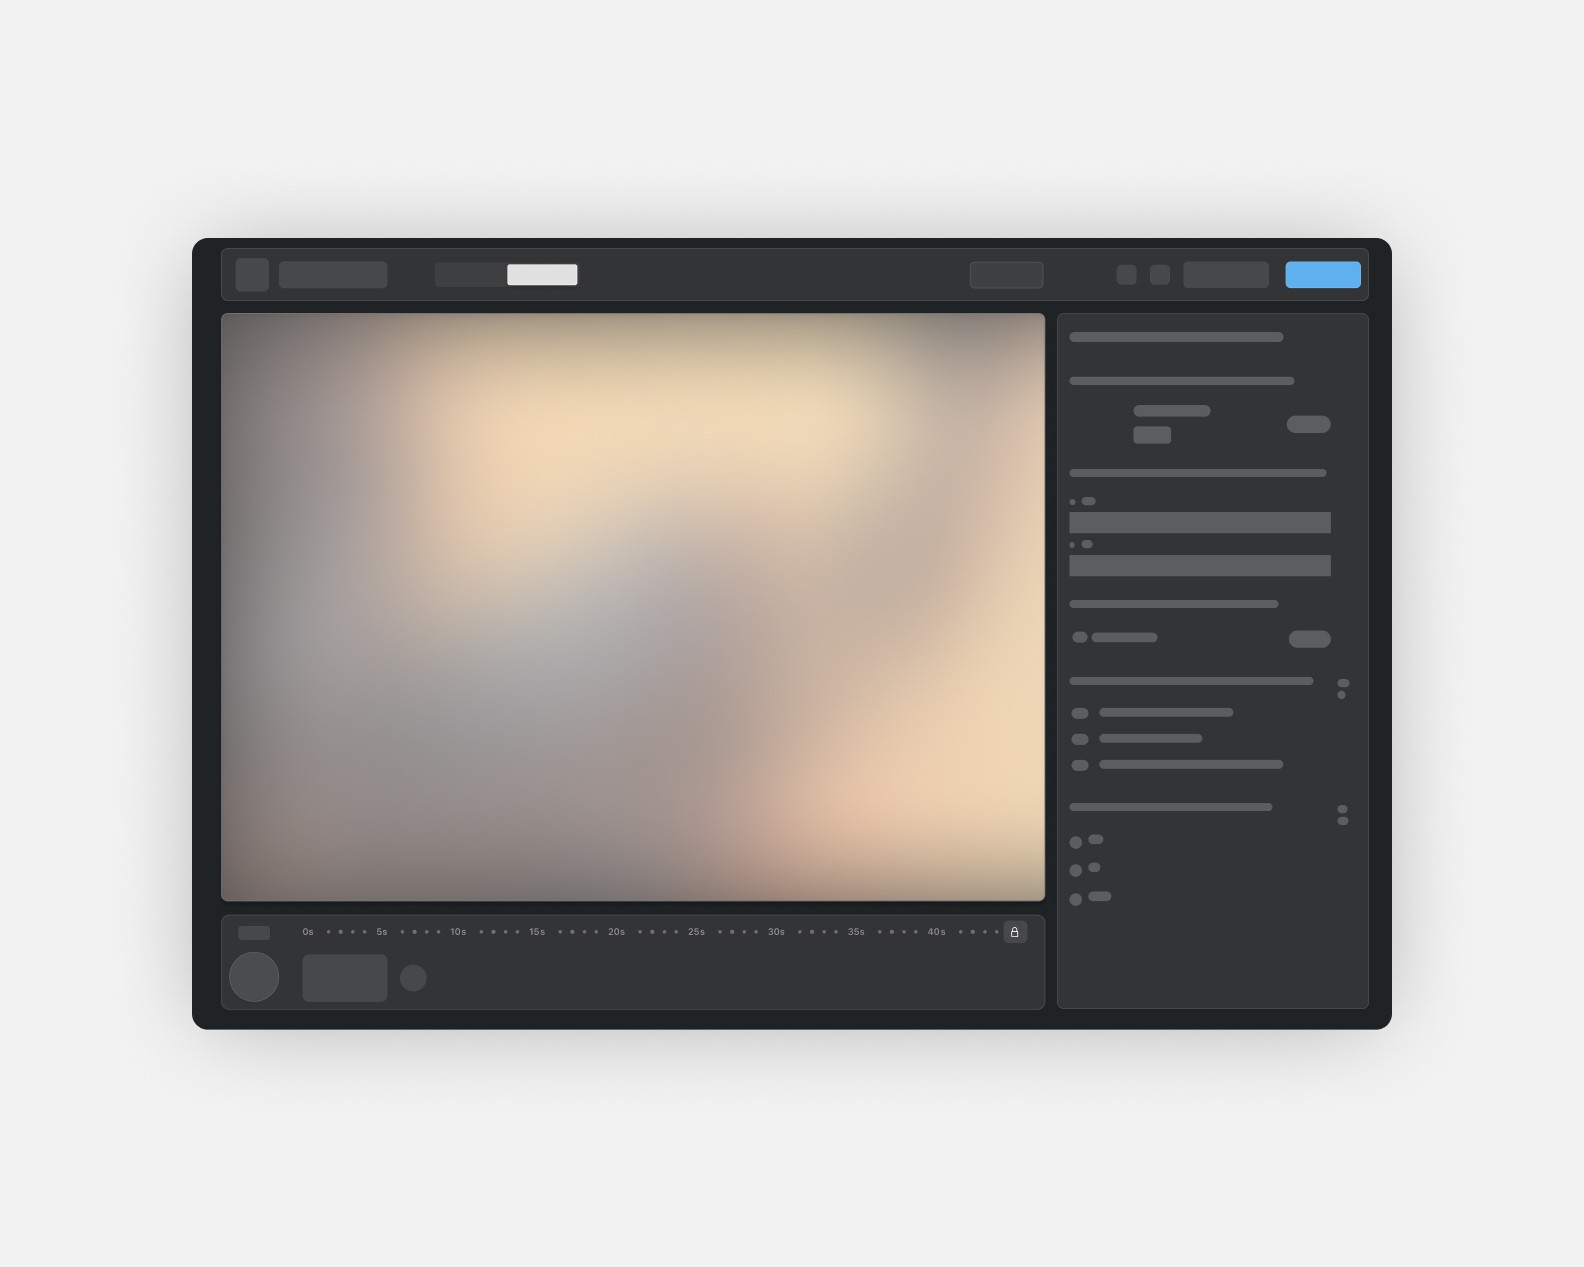
Toolbar
The toolbar contains a selection of important tools and actions. There are four groups: Navigation, Modes, Status, and Exports.
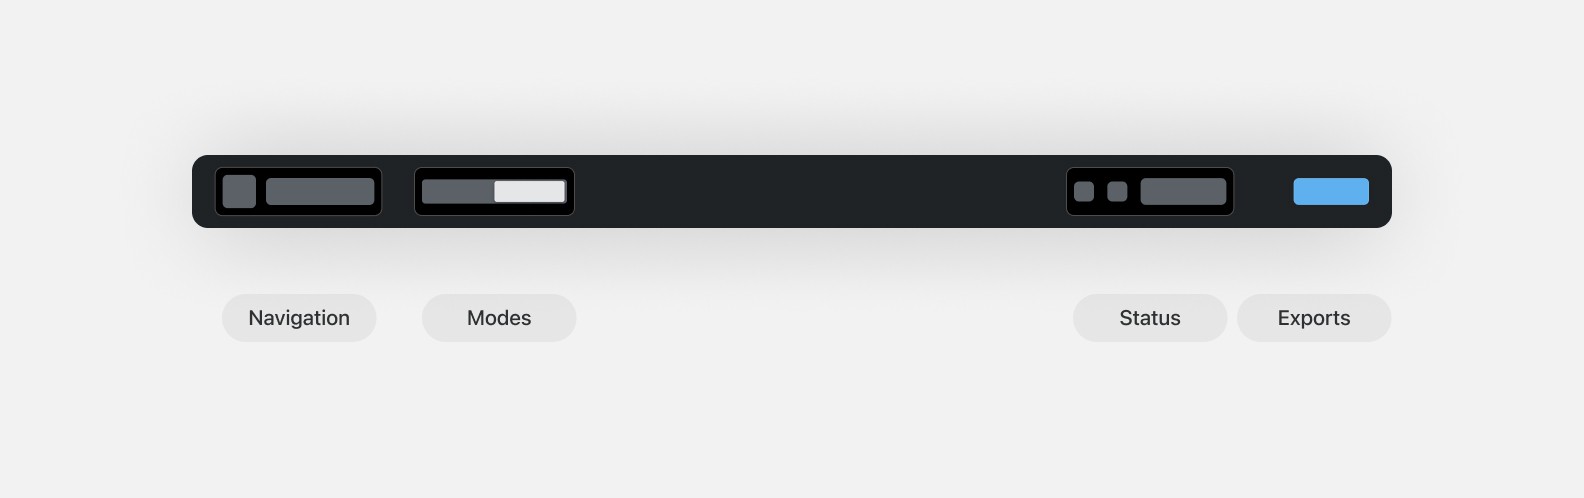
Navigation:
Return to the project navigator or view the name of the current project.
Modes:
Switch between photo and video exports. These modes will change some of the options in the timeline bar and right sidebar.
Status:
See the current connection to Glossi’s servers. If something goes wrong, you can view connection tips or give us feedback.
Exports:
Open the export panel, where you configure export type, shot settings, and begin renders.
Timeline Bar
The timeline bar manages each shot associated with a project. Depending on the selected mode, photo or video, the timeline bar will look slightly different. Regardless of mode, the timeline bar will describe each shot or camera movement.
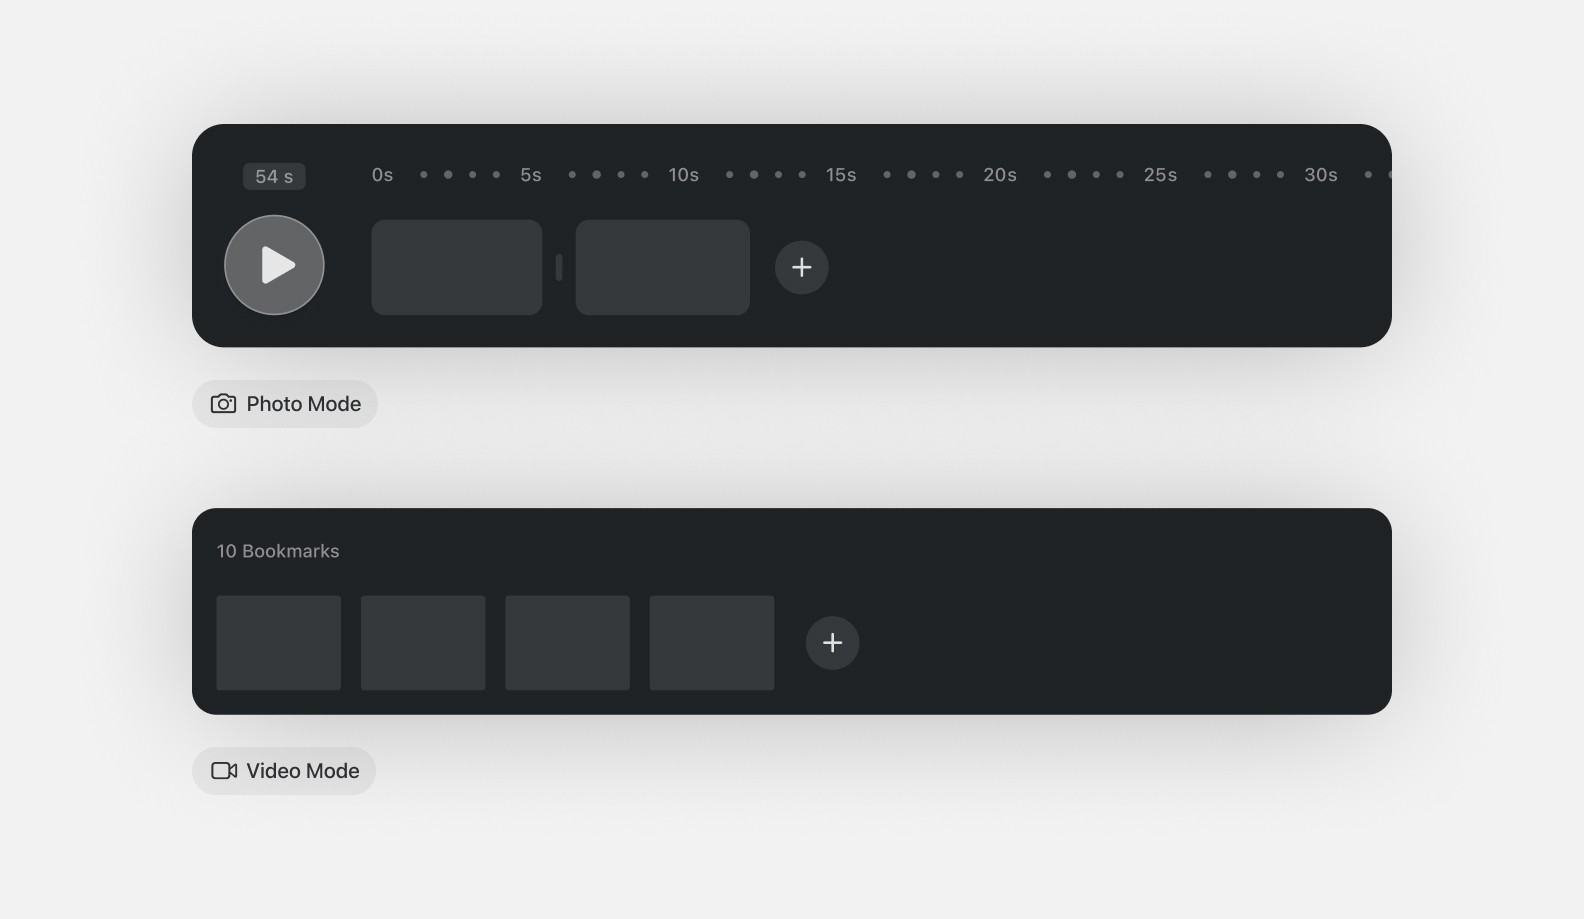
In photo mode the timeline bar will list each camera configuration. We call these bookmarks.
In video mode the timeline bar will list each shot in chronological order. The duration of each shot is indicated at the top of the bar.
In both modes, you can add, select, or delete each shot or bookmark. In video mode, you have the added controls to rearrange shots. You can also pause or play each camera movement.
Right Sidebar
The right sidebar is where you can access more information about your scene. When you don't have anything selected, you can view the properties of your project, including the backdrop, model, and window aspect ratio.
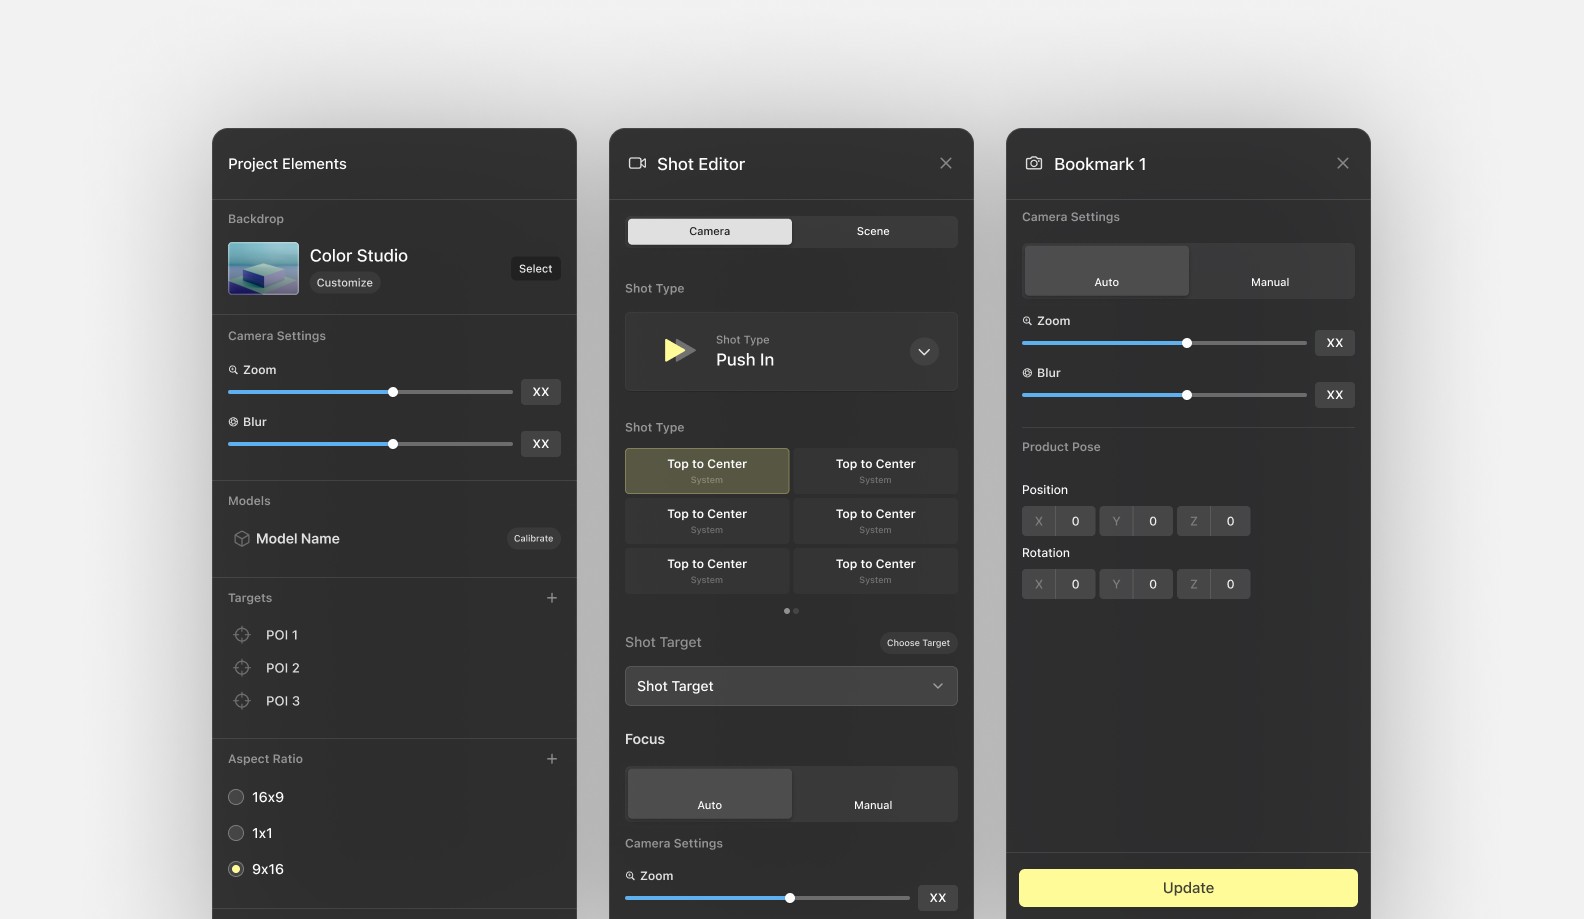
With a shot or backdrop selected, you can explore their properties. This will include properties like the shot type, camera zoom, camera position, and focus.
Scene Frame
The scene frame is your working area where you’ll adjust the model and camera for your renders. The sene frame will reflect properties adjusted in the timeline bar and right toolbar.
Pan to move around:
Right click and drag to move around the scene. The camera will move laterally to the view of the scene.
Rotate to change angles:
Left click and drag to rotate around the object. The camera will rotate with the center of the scene as the anchor point.
Zoom in and out:
Scroll to zoom in and out.
💡 Stress-free exploration If it’s your first time joining or exploring a file, interacting with things in the scene can feel a little scary. People are often worried they’ll move, change, or delete something by accident. Don’t worry. If you’ve lost your place in the scene, click on a bookmark or shot in the timeline bar to return to the saved position.
Put it all together
Let’s do a quick recap!
The toolbar gives you the options to manage or change your project mode, as well as prepare your final exports.
The timeline is where you can configure your camera with video shots or photo bookmarks.
The right sidebar is where you can view scene or camera properties.
The scene frame is where you can see what your final renders will look like. This window into the project’s 3D environment helps you visualize your renders in real time.
💡 In this guide, we’ll cover the basics of working with Glossi projects inside of Glossi Studio. You can come back to this guide any time you need a refresher. To keep it simple (and reduce our word count 😉), we’ll call them projects and the studio in this guide. Want to learn more about how Glossi’s project navigator and the Studio are related? Check out our What is Glossi? guide.
What are Projects?
Projects in Glossi offer the tools needed to create, share, and refine your 3D renders. These projects are essential for designers, product managers, marketers, and anyone interested in 3D creation, offering a platform to explore ideas or manage the entire 3D rendering process.
Projects contain a single model with an associated environment and camera configurations. To work on your scenes and export renders, open a project with the Studio.
Learn more about the relationship between projects, models, workspaces, and exports at Project Structure and Organization↗
Opening projects in the Studio
When first opening the Glossi app, a new instance of the studio has to start up. Because of the intense computational requirements of a real-time rendering environment, this may take a few minutes. You can check the Studio’s connection status in the top right of the project navigator.
A few tips to ensure the best connection:
Ensure you have a strong internet connection. For an ideal experience, it’s recommended that you have 100 Mbps down / 10 Mbps up. Although lower speeds might affect the streaming responsiveness of the app, it won’t effect the quality of renders. Don’t know your connection strength? You can test it here
Only open a single tab of the Glossi app at a time. Multiple tabs can cause conflicts and fight for bandwidth.
Find your way around
If you're new to Glossi, it's normal to feel a bit lost when you first open a project. We’ll take you on a tour, so you can orient yourself and start rendering your models.
The Studio has four distinct regions: a toolbar, a timeline bar, a right sidebar, and the scene frame. We’ve simplified the layout so you can get to know what lives in each location.
Toolbar
The toolbar contains a selection of important tools and actions. There are four groups: Navigation, Modes, Status, and Exports.
Navigation:
Return to the project navigator or view the name of the current project.
Modes:
Switch between photo and video exports. These modes will change some of the options in the timeline bar and right sidebar.
Status:
See the current connection to Glossi’s servers. If something goes wrong, you can view connection tips or give us feedback.
Exports:
Open the export panel, where you configure export type, shot settings, and begin renders.
Timeline Bar
The timeline bar manages each shot associated with a project. Depending on the selected mode, photo or video, the timeline bar will look slightly different. Regardless of mode, the timeline bar will describe each shot or camera movement.
In photo mode the timeline bar will list each camera configuration. We call these bookmarks.
In video mode the timeline bar will list each shot in chronological order. The duration of each shot is indicated at the top of the bar.
In both modes, you can add, select, or delete each shot or bookmark. In video mode, you have the added controls to rearrange shots. You can also pause or play each camera movement.
Right Sidebar
The right sidebar is where you can access more information about your scene. When you don't have anything selected, you can view the properties of your project, including the backdrop, model, and window aspect ratio.
With a shot or backdrop selected, you can explore their properties. This will include properties like the shot type, camera zoom, camera position, and focus.
Scene Frame
The scene frame is your working area where you’ll adjust the model and camera for your renders. The sene frame will reflect properties adjusted in the timeline bar and right toolbar.
Pan to move around:
Right click and drag to move around the scene. The camera will move laterally to the view of the scene.
Rotate to change angles:
Left click and drag to rotate around the object. The camera will rotate with the center of the scene as the anchor point.
Zoom in and out:
Scroll to zoom in and out.
💡 Stress-free exploration If it’s your first time joining or exploring a file, interacting with things in the scene can feel a little scary. People are often worried they’ll move, change, or delete something by accident. Don’t worry. If you’ve lost your place in the scene, click on a bookmark or shot in the timeline bar to return to the saved position.
Put it all together
Let’s do a quick recap!
The toolbar gives you the options to manage or change your project mode, as well as prepare your final exports.
The timeline is where you can configure your camera with video shots or photo bookmarks.
The right sidebar is where you can view scene or camera properties.
The scene frame is where you can see what your final renders will look like. This window into the project’s 3D environment helps you visualize your renders in real time.